MOD. BV5724 خالط مع إناء اميلعت. Solac is a registered Trade Mark MIXER SE SKLENĚNOU NÁDOBOU NÁVOD K POUZITÍ BATIDORA DE VASO INSTRUCCIONES DE USO
|
|
|
- Natálie Vlčková
- před 6 lety
- Počet zobrazení:
Transkript

1 MOD. BV5724 BATIDORA DE VASO INSTRUCCIONES DE USO JAR BLENDER INSTRUCTIONS FOR USE BLENDER MODE D EMPLOI STANDMIXER GEBRAUCHSANLEITUNG LIQUIDIFICADORA INSTRUÇÕES DE USO FRULLATORE A BICCHIERE ISTRUZIONI PER L USO BLENDER GEBRUIKSAANWIJZING MIXER SE SKLENĚNOU NÁDOBOU NÁVOD K POUZITÍ BLENDER KIELICHOWY INSTRUKCJA OBSŁUGI MIXÉR SO SKLENENOU NÁDOBOU NÁVOD NA POUŽITIE TURMIXGÉP HASZNÁLATI UTASÍTÁS МИКСЕР С КАНА ГЛАДЕНЕ ИНСТРУКЦИЯ ЗА УПОТРЕБАА BLENDER CU VAS INSTRUCŢIUNI DE UTILIZARE خالط مع إناء اميلعت Solac is a registered Trade Mark
2 A B G C E F D H

3 Fig. 1 Fig. 2 Fig. 3
4 ESPAÑOL Distinguido cliente: Le agradecemos que se haya decidido por la compra de un producto de la marca SOLAC. Su tecnología, diseño y funcionalidad, junto con el hecho de superar las más estrictas normas de calidad le comportarán total satisfacción durante mucho tiempo. CONSEJOS Y ADVERTENCIAS DE SEGURIDAD Leer atentamente este folleto de instrucciones antes de poner el aparato en marcha y guardarlo para posteriores consultas. La no observación y cumplimiento de estas instrucciones pueden comportar como resultado un accidente. Antes del primer uso, limpiar todas las partes del producto que puedan estar en contacto con alimentos, procediendo tal como se indica en el apartado de limpieza. Este aparato no debe ser usado por niños. Mantener el aparato y su conexión de red fuera del alcance de los niños. Este aparato pueden utilizarlo personas con capacidades físicas, sensoriales o mentales reducidas o falta de experiencia y conocimiento, si se les ha dado la supervisión o formación apropiadas respecto al uso del aparato de una manera ES segura y comprenden los peligros que implica. Este aparato no es un juguete. Los niños deben estar bajo vigilancia para asegurar que no jueguen con el aparato. Tenga cuidado al verter líquidos calientes dentro del procesador de alimentos o batidora, ya que pueden salir expulsados a causa de una repentina emisión de vapor. Las cuchillas están afiladas y existe riesgo de corte, proceder con cautela y evitar el contacto directo con el filo de las mismas. Prestar especial atención durante el manejo de las cuchillas, durante operaciones de montaje y desmontaje, vaciado de jarra y limpieza. Desconectar el aparato y desenchufar la alimentación si se deja desatendido y antes de cambiar los accesorios o partes próximas que se mueven durante el uso, del montaje, del desmontaje o de la limpieza. Si la conexión red está dañada, debe ser substituida, llevar el aparato a un Servicio de Asistencia Técnica autorizado. Con el fin de evitar un peligro,
5 ES no intente desmontarlo o repararlo por sí mismo. Este aparato está pensado únicamente para un uso doméstico, no para uso profesional o industrial. Antes de conectar el aparato a la red, verificar que el voltaje indicado en la placa de características coincide con el voltaje de red. Conectar el aparato a una base de toma de corriente que soporte como mínimo 10 amperios. La clavija del aparato debe coincidir con la base eléctrica de la toma de corriente. Nunca modificar la clavija. No usar adaptadores de clavija. El aparato debe utilizarse y colocarse sobre una superficie plana y estable. No utilizar el aparato con el cable eléctrico o la clavija dañada. Si alguna de las envolventes del aparato se rompe, desconectar inmediatamente el aparato de la red para evitar la posibilidad de sufrir un choque eléctrico. No utilizar el aparato si ha caído, si hay señales visibles de daños, o si existe fuga. No forzar el cable eléctrico de conexión. Nunca usar el cable eléctrico para levantar, transportar o desenchufar el aparato. No dejar que el cable eléctrico de conexión quede atrapado o arrugado. Verificar el estado del cable eléctrico de conexión. Los cables dañados o enredados aumentan el riesgo de choque eléctrico. No exponer el aparato a la lluvia o condiciones de humedad. El agua que entre en el aparato aumentará el riesgo de choque eléctrico. No tocar la clavija de conexión con las manos mojadas. Tomar las medidas necesarias para evitar la puesta en marcha no intencionada del aparato. Antes de utilizar el aparato asegúrese que la cuchilla/s estén bien fijadas al aparato. No tocar las partes móviles del aparato en marcha. Tener precaución después de la operación de paro del aparato, ya que la cuchilla/s seguirán girando por efecto de su inercia mecánica. UTILIZACIÓN Y CUIDADOS: Antes de cada uso, desenrollar completamente el cable de alimentación del aparato. No usar el aparato si sus accesorios no están debidamente acoplados. No usar el aparato si los accesorios acoplados a él presentan defectos. Proceda a sustituirlos inmediatamente. No utilizar el aparato con la jarra vacía. No usar el aparato si su dispositivo de puesta en marcha/paro no funciona. No mover el aparato mientras está en uso. No utilizar el aparato inclinado, ni darle la vuelta. No dar la vuelta al aparato mientras está en uso o conectado a la red. No forzar la capacidad de trabajo del aparato. Respetar la indicación de nivel MAX. No agregar un volumen de líquido caliente superior a la mitad de la capacidad de la jarra, y en todo caso si existen líquidos calientes en el interior de la jarra, usar solamente la velocidad más lenta. Guardar este aparato fuera del alcance de los niños y/o personas con capacidades físicas, sensoriales o mentales reducidas o falta de experiencia y conocimiento. NUNCA vierta alimentos muy calientes o hirviendo en la jarra, podría provocarse quemaduras durante el proceso. Los contrastes bruscos de temperatura podrían además romper la jarra. Usar este aparato, sus accesorios y herramientas de acuerdo con estas instrucciones, teniendo en cuenta las condiciones de trabajo y el trabajo a realizar. Usar el aparato para operaciones diferentes a las previstas podría causar una situación de peligro. No utilizar nunca líquidos que estén hirviendo ni ingredientes cuya temperatura supere los 80ºC. Comprobar que la tapa esté perfectamente cerrada antes de poner en marcha el aparato. No dejar nunca el aparato conectado y sin vigilancia. Además ahorrará energía y prolongará la vida del aparato. No utilizar el aparato más de 2 minutos seguidos. En caso de realizar ciclos respetar siempre periodos de reposo entre ciclos de 30 segundos como mínimo. En ningún caso es conveniente tener el aparato en funcionamiento durante más del tiempo necesario.
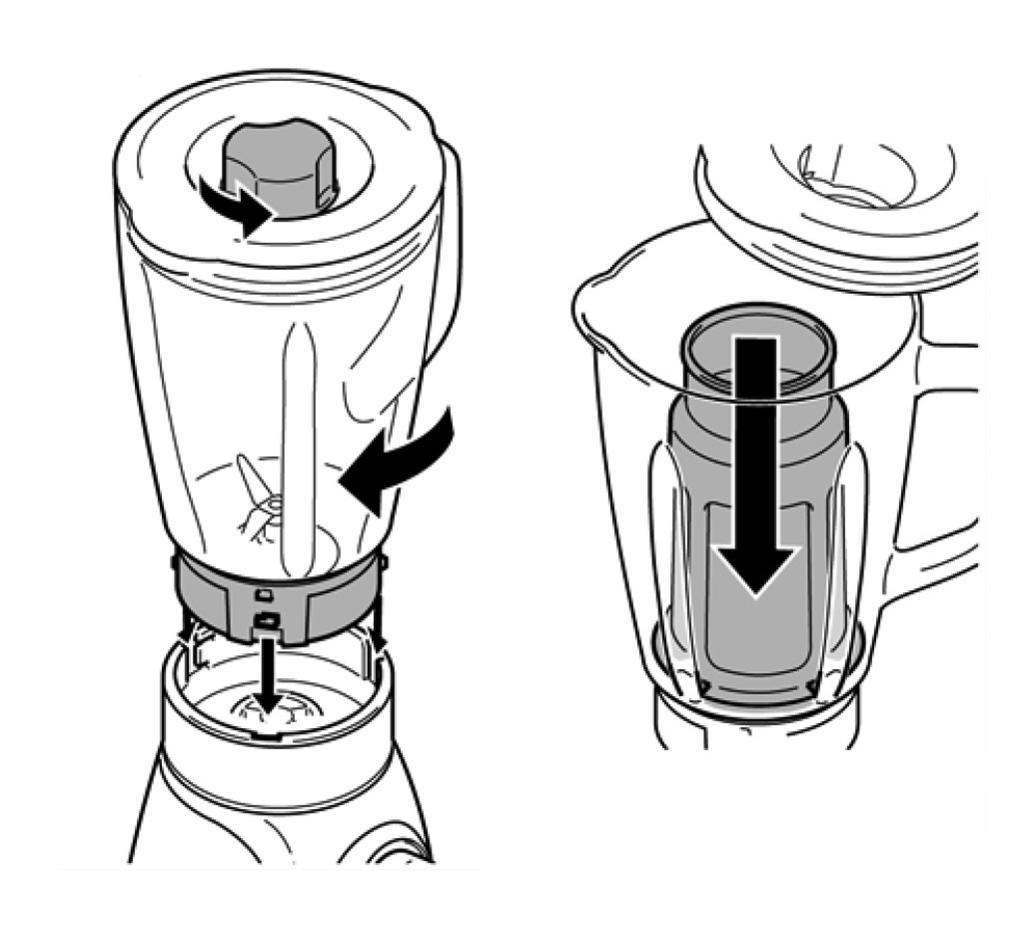
6 ES Para picar hielo, no introducir más de 10 cubitos cada vez. Si desea añadir más hielo, retire el vaso medidor e introduzca los cubitos uno a uno. No usar el aparato con alimentos congelados o huesos. ADVERTENCIA: No usar el aparato si el cristal está agrietado o roto. SERVICIO: Toda utilización inadecuada, o en desacuerdo con las instrucciones de uso, puede comportar peligro, anulando la garantía y la responsabilidad del fabricante. DESCRIPCIÓN A Vaso medidor B Tapa Jarra C Jarra D Cuerpo motor E Set Cuchillas F Selector de velocidad G Filtro para zumo H Recogecables Caso de que su modelo de aparato no disponga de los accesorios descritos anteriormente, éstos también pueden adquirirse por separado en los Servicios de Asistencia Técnica. MODO DE EMPLEO NOTAS PREVIAS AL USO: Asegúrese de que ha retirado todo el material de embalaje del producto. Antes de usar el producto por primera vez, limpie las partes en contacto con alimentos tal como se describe en el apartado de Limpieza. MONTAJE DE LA JARRA Y FILTRO Encaje la jarra sobre el cuerpo principal. Para ello, coloque la jarra (C) sobre el cuerpo (D) de modo que coincidan los salientes de la jarra con las ranuras del cuerpo. Gire la jarra en el sentido de las agujas del reloj hasta que quede perfectamente encajada (Fig 1). Asegúrese de encajar correctamente la jarra sobre el cuerpo de lo contrario no se pondrá en funcionamiento. Si desea utilizar la batidora como exprimidor de zumo, coloque el filtro (G) alrededor de la cuchilla (E) (Fig. 2) USO: Desenrollar completamente el cable antes de enchufar. Asegúrese de que el aro de fijación de las cuchillas está bien sujeto a la jarra (girándolo en el sentido contrario a las agujas del reloj) antes de colocar en cuerpo motor. (Fig. 3) Coloque la jarra en la unidad motor y gírela en el sentido de las agujas del reloj hasta que quede bien acoplada en posición de bloqueo al oír un clic. (Fig.1). Introduzca los ingredientes, después de haberlos troceado, en la jarra con líquido (sin sobrepasar la marca de nivel máximo). Coloque la tapa en la jarra, asegurándose de que queda bien fijada. Coloque el vaso medidor en la tapa. (Fig. 1) Enchufar el aparato a la red eléctrica. Poner el aparato en marcha, accionando el mando selector. Elija la velocidad deseada y empiece a mezclar. La velocidad P (posición turbo), deberá mantener esta posición durante el tiempo que desee prolongar el funcionamiento del aparato (máximo 2 minutos de funcionamiento continuo). Durante el funcionamiento sujete la tapa firmemente con las dos manos. Si desea añadir más ingredientes, extraiga el vaso medidor. Añada los ingredientes y vuelva a colocar el vaso medidor. Nunca retire la tapa durante el uso. Para parar el aparato seleccione otra vez la velocidad 0. Para evitar un arranque demasiado brusco, recomendamos efectuar la puesta en marcha con el mando selector de potencia situado en su posición mínima, y progresivamente una vez el aparto ha arrancado. CONTROL ELECTRÓNICO DE VELOCIDAD: Se puede controlar la velocidad del aparato, simplemente actuando sobre el mando de control de velocidad (F). Esta función es muy útil ya que permite adaptar la velocidad del aparato al tipo de trabajo que se precise realizar.
7 ES UNA VEZ FINALIZADO EL USO DEL APA- RATO: Parar el aparato, seleccionando la posición 0 del mando selector. Desenchufar el aparato de la red eléctrica. Gire la jarra mezcladora en el sentido contrario de las agujas del reloj y extráigala del cuerpo motor. Limpiar el aparato. FUNCIÓN TURBO El aparato funciona con la velocidad máxima para lograr un rendimiento óptimo. Seleccione la velocidad P y mantener esta posición durante el tiempo que desee. No más de 2 minutos seguidos. FUNCIONAMIENTO DEL FILTRO PRECAUCIONES: No utilice nunca el filtro para procesar ingredientes a más de 80ºC de temperatura. No sobrecargue nunca el filtro. Antes de encender el aparato, asegúrese siempre de que la tapa esté bien cerrada/colocada, y de que el vaso medidor esté bien puesto en la tapa. Corte la fruta en trozos pequeños antes de ponerla en el filtro. Ponga en remojo los ingredientes secos, como las legumbres o los granos de soja, antes de ponerlos en el filtro. USO: El filtro evita que las pepitas y las pieles de la fruta se mezclen con la bebida. Una vez la jarra (C) esté bien encajada en el cuerpo motor (A) (Fig. 1). Coloque el filtro (G) alrededor de la cuchilla (D) (Fig. 2). Asegúrese de que las ranuras del filtro encajan perfectamente en los resaltes del interior de la jarra de la batidora. Coloque la tapa en la jarra. ATENCIÓN: Asegúrese de colocar la tapa en la jarra de forma que se pueda servir la bebida a través del filtro de la tapa. Corte la fruta a trozos pequeños o ponga en remojo los ingredientes secos antes de ponerlos en el filtro. Coloque los ingredientes en el filtro y vierta agua u otro líquido en la jarra a través del orificio de la tapa. Coloque el vaso medidor en la tapa (Fig. 1). Enchufar el aparato a la red eléctrica. Elija la velocidad deseada y empiece a mezclar. NOTA: Cuando procese una gran cantidad, recomendamos que no ponga todos los ingredientes en el filtro al mismo tiempo. Comience por una pequeña cantidad y deje funcionar el aparato durante unos segundos. Luego apague el aparato y añada otra pequeña cantidad, sin sobrepasar la parte superior de la malla del tamiz. Repita este procedimiento hasta que haya procesado todos los ingredientes. Deje siempre puesta la tapa de la jarra de la batidora mientras ésta esté en funcionamiento. UNA VEZ FINALIZADO EL USO DEL FILTRO: Apague el aparato y quite la jarra del cuerpo motor. Sirva la bebida por la boquilla de la jarra, sin quitar la tapa, el vaso medidor ni el filtro. Asegúrese de colocar la tapa en la jarra de forma que se pueda servir la bebida a través del filtro de la tapa. Limpie el filtro inmediatamente después de usarlo. LIMPIEZA Desenchufar el aparato de la red y dejarlo enfriar antes de iniciar cualquier operación de limpieza. Limpiar el aparato con un paño húmedo impregnado con unas gotas de detergente y secarlo después. No utilizar disolventes, ni productos con un factor ph ácido o básico como la lejía, ni productos abrasivos, para la limpieza del aparato. No deje entrar agua u otro líquido por las aberturas de ventilación para evitar daños en las partes operativas interiores del aparato. No sumergir el aparato en agua u otro líquido, ni ponerlo bajo el grifo. Durante el proceso de limpieza hay que tener especial cuidado con las cuchillas ya que están muy afiladas. Se recomienda limpiar el aparato regularmente y retirar todos los restos de alimentos. Las siguientes piezas son aptas para su limpieza en agua caliente jabonosa o en el
8 ES lavavajillas (usando un programa suave de lavado): - Jarra (sin sus cuchillas). - Filtro. - Tapa Jarra. - Vaso medidor. La posición de escurrido/secado de las piezas lavables en el lavavajillas o fregadero debe permitir el escurrido del agua con facilidad. A continuación, seque todas las piezas antes de su montaje y guardado. FUNCIÓN AUTOLIMPIEZA: Introduzca agua y una pequeña cantidad de detergente en la jarra. Seleccione la función turbo. CUCHILLAS EXTRAÍBLES PARA UNA LIM- PIEZA EFECTIVA (SOLAMENTE CON LA BA- TIDORA DE JARRA): Afloje el aro de fijación de la cuchilla girándolo en el sentido de las agujas de reloj. (Fig.3). Extraiga el aro de fijación, la cuchilla, la junta de sellado y proceda a limpiarlos. Después de la limpieza, vuelva a colocar la cuchilla y gire el aro de fijación en el sentido contrario. medios adecuados a manos de un gestor de residuos autorizado para la recogida selectiva de Residuos de Aparatos Eléctricos y Electrónicos (RAEE). Este aparato cumple con la Directiva 2014/35/ EU de Baja Tensión, con la Directiva 2014/30/ EU de Compatibilidad Electromagnética, con la Directiva 2011/65/EU sobre restricciones a la utilización de determinadas sustancias peligrosas en aparatos eléctricos y electrónicos y con la Directiva 2009/125/EC sobre los requisitos de diseño ecológico aplicable a los productos relacionados con la energía. ANOMALÍAS Y REPARACIÓN En caso de avería llevar el aparato a un Servicio de Asistencia Técnica autorizado. No intente desmontarlo o repararlo ya que puede existir peligro. PARA LAS VERSIONES EU DEL PRODUCTO Y/O EN EL CASO DE QUE EN SU PAÍS APLI- QUE: ECOLOGÍA Y RECICLABILIDAD DEL PRO- DUCTO Los materiales que constituyen el envase de este aparato, están integrados en un sistema de recogida, clasificación y reciclado de los mismos. Si desea deshacerse de ellos, puede utilizar los contenedores públicos apropiados para cada tipo de material. El producto está exento de concentraciones de sustancias que se puedan considerar dañinas para el medio ambiente. Este símbolo significa que si desea deshacerse del producto, una vez transcurrida la vida del mismo, debe depositarlo por los
9 ENGLISH EN Dear customer, Many thanks for choosing to purchase a SOLAC brand product. Thanks to its technology, design and operation and the fact that it exceeds the strictest quality standards, a fully satisfactory use and long product life can be assured. SAFETY ADVICE AND WARNINGS Read these instructions carefully before switching on the appliance and keep them for future reference. Failure to follow and observe these instructions could lead to an accident. Clean all the parts of the product that will be in contact with food, as indicated in the cleaning section, before use. This appliance shall not be used by children. Keep the appliance and its cord out of reach of children. This appliance can be used by people with reduced physical, sensory or mental capabilities or lack of experience and knowledge if they have been given supervision or instruction concerning use of the appliance in a safe way and understand the hazards involved. This appliance is not a toy. Children should be supervised to ensure that they do not play with the appliance. Be careful if hot liquid is poured into the food processor or blender as it can be ejected out of the appliance due to a sudden steaming. Blades are sharp and could cause harm, be careful and avoid direct contact with the blades cutting edges. Pay special attention when handling the blades, during assembly and disassembly operations, emptying the bowl and during cleaning. Always switch off the appliance and disconnect from supply if it is left unattended and before changing accessories or approaching parts that move in use, assembling, disassembling and cleaning. If the connection to the mains has been damaged, it must be replaced, take the appliance to an authorised technical support service. Do not attempt to disassemble or repair the appliance by yourself in order to avoid a hazard. This appliance is for household use only, not professional, industrial use.
10 EN Ensure that the voltage indicated on the rating label matches the mains voltage before plugging in the appliance. Connect the appliance to a socket that can supply a minimum of 10 amperes. The appliance s plug must fit into the mains socket properly. Do not alter the plug. Do not use plug adaptors. The appliance must be used and placed on a flat, stable surface. Do not use the appliance if the cable or plug is damaged. If any of the appliance casings breaks, immediately disconnect the appliance from the mains to prevent the possibility of an electric shock. Do not use the appliance if it has fallen on the floor, if there are visible signs of damage or if it has a leak. Do not force the power cord. Never use the power cord to lift up, carry or unplug the appliance. Do not clip or crease the power cord. Check the state of the power cord. Damaged or tangled cables increase the risk of electric shock. Do not leave the appliance out in the rain or exposed to moisture. If water gets into the appliance, this will increase the risk of electric shock. Do not touch the plug with wet hands. Take the necessary measures to avoid starting the appliance involuntarily. Before using the appliance ensure that the blade is properly fixed in place. Do not touch any of the appliance s moving parts while it is operating. Exercise precaution after employing the stop operation on the appliance as the blade/s will continue moving from the effect of its own mechanical inertia. USE AND CARE: Fully unroll the appliance s power cable before each use. Do not use the appliance if its accessories are not properly fitted. Do not use the appliance if the accessories attached to it are defective. Replace them immediately. Do not use the appliance while the jug is empty. Do not use the appliance if the on/off switch does not work. Do not move the appliance while in use. Do not use the appliance if it is tipped up and do not turn it over. Do not turn the appliance over while it is in use or connected to the mains. Do not force the appliance s work capacity. Respect the MAX level indicator. When using hot liquids do not fill the jug more than half way. At all times, when mixing hot liquids in the jug, select the slowest speed on the speed selector. Store this appliance out of reach of children and/or persons with physical, sensory or reduced mental or lack of experience and knowledge. NEVER pour hot or boiling food into the jug, it may cause burns during the process. Abrupt temperature contrasts could also break the jar. Use the appliance and its accessories and tools in accordance with these instructions, taking into account the working conditions and the work to be performed. Use the appliance for operations different from those intended could result in a hazardous situation. Never use liquids that are boiling or ingredients whose temperature exceeds 80ºC. Check that the lid is closed properly before starting the appliance. Never leave the appliance unattended while in use. Never leave the appliance connected and unattended if is not in use. This saves energy and prolongs the life of the appliance. Do not use the appliance for more than 2 minutes at a time. In case of operate in cycles; allow the appliance a resting period of at least 30 seconds between each cycle. Under no circumstances should the appliance be operated for more time than necessary. To crush ice, do not introduce more than 10 cubes at a time. To add more ice, remove the measuring cup and insert the cubes one by one. Do not use the appliance with frozen goods or those containing bones. CAUTION: Do not use the appliance if the glass is cracked or broken.
11 ENGLISH SERVICE: Any misuse or failure to follow the instructions for use renders the guarantee and the manufacturer s liability null and void. DESCRIPTION A Measuring cup B Jar Lid C Jar D Motor body E Blades set F Speed selector G Juice Filter H Cable winder If the model of your appliance does not have the accessories described above, they can also be bought separately from the Technical Assistance Service. INSTRUCTIONS FOR USE BEFORE USE: Make sure that all products packaging has been removed. Before using the product for the first time, clean the parts that will come into contact with food in the manner described in the cleaning section. ASSEMBLING THE JUG AND THE FILTER: Fit the jug onto the main body. To do so, position the jar (C) over the body (B) so that the protrusions from the jug align with the grooves of the body. Turn the jug clockwise until it fits snugly (Fig.1). Be sure to fit the jug onto the body correctly otherwise it will not switch on. If you would like to use the blender as a juicer, place the filter (G) around the blade (E) (Fig. 2) USE: Unroll the cable completely before plugging it in. Ensure the blade fixing ring is fixed properly to the jar (by turning counter clockwise) before putting on the motor body. (Fig.3). Place the jar onto to the motor unit; turn clockwise until the lock clicks into place. (Fig.1). Put the ingredients, after having first chopped them into small piece, into the jar with liquid (do not exceed the maximum marker). Put the lid on the jar; make sure it is properly fixed in place. Put the measuring cup in the lid (Fig. 1) Connect the appliance to the mains. Choose desired speed and start blending. Speed P (position for turbo) Hold it in this position for as long as you want the appliance to continue operating (maximum of 2 minute of continuous operation). During operation hold the lid on firmly using both hands If you wish to add more ingredients pull out the measuring cup. Add the ingredients and replace the measuring cup. Never remove the lid while the appliance is operating. To stop the appliance set the speed back to 0. To avoid a fierce, start up of the fan, it is advisable to start off from the lowest speed position and, once the fan has been switched on, progressively increase the speed to the desired position. ELECTRONIC SPEED CONTROL: The speed of the appliance can be regulated by using the speed regulator control (F). This function is very useful, as it makes it possible to adapt the speed of the appliance to the type of work that needs to be done. ONCE YOU HAVE FINISHED USING THE APPLIANCE: Stop the appliance, selecting position 0 on the selector control. Unplug the appliance from the mains. Turn the mixing jar anticlockwise and remove it from the motor body. Clean the appliance. TURBO FUNCTION The appliance works in highest speed to achieve optimal performance. Select the speed P and hold this position for as long as need. No more than 2 minutes at a time. FILTER OPERATION PRECAUTIONS: EN Never use the filter to process ingredients thaåt are hotter than 80ºC. Never overload the filter.
12 EN Before switching on the appliance, always make sure that the lid is correctly fitted/closed and that the measuring beaker is in well inserted into the lid. Cut fruit into small pieces before putting it into the filter. Soak dry ingredients, such as legumes or soy beans, before putting them into the filter. USE: The filter prevents fruit skin and pips from mixing with the drink. Once the jar (C) is fitted correctly onto the motor body (A) (Fig. 1). Place the filter (G) around the blade (D) (Fig. 2). Make sure that the slots on the filter fit perfectly into the spigots on the blender jug. Place the lid on the jug. PLEASE NOTE: Be sure to put the lid on the jug so that the drink is served through the filter in the lid. Cut fruit into small pieces or soak dry ingredients before putting them into the filter. Place the ingredients in the filter and pour water or other liquid into the jug through the hole in the lid. Insert the measuring beaker into the lid (Fig. 1). Connect the appliance to the mains. Choose the desired speed and start blending. NOTE: When processing large quantities, it is advisable not to put all of the ingredients into the filter at the same time. Start with a small amount and let the appliance run for a few seconds. Then switch off the appliance and add another small amount, without filling beyond the top of the sieve mesh. Repeat this procedure until all the ingredients have been processed. Always leave the blender jug lid on while it is operating. ONCE YOU HAVE FINISHED USING THE FILTER: Switch the appliance off and remove the jug from the motor body. Serve the drink through the spout on the jug, without removing the lid, measuring beaker or filter. Be sure to put the lid on the jug so that the drink is served through the filter in the lid. Clean filter immediately after using it. CLEANING Disconnect the appliance from the mains and allow it to cool before undertaking any cleaning task. Clean the equipment with a damp cloth with a few drops of washing-up liquid and then dry. Do not use solvents, or products with an acid or base ph such as bleach, or abrasive products, for cleaning the appliance. Do not let water or any other liquid get into the air vents to avoid damage to the inner parts of the appliance. Never submerge the appliance in water or any other liquid or place it under running water. During the cleaning process, take special care with the blades, as they are very sharp. It is advisable to clean the appliance regularly and remove any food remains. The following pieces may be washed in a dishwasher (using a soft cleaning program): - Jug (without its blades). - Removable filter. - Lid. - Measuring cup. The draining/drying position of the articles washable in the dishwasher or in the sink must allow the water to drain away easily. Then dry all parts before its assembly and storage. SELF-CLEANING FUNCTION: Put water and a small amount of washing up liquid in the jar. Select the function turbo. REMOVABLE BLADES FOR EFFECTIVE CLEANING (JAR BLENDER ONLY) Loosen the blade fixing ring by turning it in clockwise direction. (Fig.3). Remove the blade fixing ring, blade set, sealing ring and clean them. After cleaning, replace the blade set and turn blade fixing ring in opposite direction. ANOMALIES AND REPAIR Take the appliance to an authorised technical support service if product is damaged or other problems arise. Do not attempt to disassemble or repair the appliance yourself as this may be dangerous.
13 ENGLISH EN FOR EU PRODUCT VERSIONS AND/OR IN CASE THAT IT IS REQUESTED IN YOUR COUNTRY: ECOLOGY AND RECYCLABILITY OF THE PRODUCT The materials of which the packaging of this appliance consists are included in a collection, classification and recycling system. Should you wish to dispose of them, use the appropriate public recycling bins for each type of material. The product does not contain concentrations of substances that could be considered harmful to the environment. This symbol means that in case you wish to dispose of the product once its working life has ended; take it to an authorised waste agent for the selective collection of Waste from Electric and Electronic Equipment (WEEE). This appliance complies with Directive 2014/35/ EU on Low Voltage, Directive 2014/30/EU on Electromagnetic Compatibility, Directive 2011/65/EU on the restrictions of the use of certain hazardous substances in electrical and electronic equipment and Directive 2009/125/EC on the ecodesign requirements for energy-related products.
14 FRANÇAIS Cher Client, Nous vous remercions d avoir acheté un produit SOLAC. Sa technologie, son design et sa fonctionnalité, outre sa parfaite conformité aux normes de qualité les plus strictes, vous permettront d en tirer une longue et durable satisfaction. CONSEILS ET MESURES DE SECURITE Lire attentivement cette notice d instructions avant de mettre l appareil en marche, et la conserver pour la consulter ultérieurement. Le non-respect de ces instructions peut être source d accident. Avant la première utilisation, laver les parties en contact avec les aliments comme indiqué à la section nettoyage. Cet appareil ne doit pas être utilisé par des enfants. Tenir l appareil et sa fiche hors de portée des enfants. Cet appareil peut être utilisé par des personnes ayant des capacités physiques, sensorielles ou mentales réduites ou des personnes manquant d expérience à condition de le faire sous surveillance ou après avoir reçu les instructions pour un maniement sûr de l appareil et en ayant compris les risques qu il comporte. FR Cet appareil n est pas un jouet. Les enfants doivent être surveillés afin de s assurer qu ils ne jouent pas avec l appareil. Faire attention en versant des liquides chauds dans le robot culinaire ou mixeur/blender, car ils pourraient être expulsés suite à une libération soudaine de vapeur. Les lames sont aiguisées et vous pourriez vous blesser. Agissez avec précaution en évitant tout contact direct avec leur tranchant. Il faudra être particulièrement attentif lorsque vous manipulerez les lames lors du montage / démontage, au moment de vider le bol/verseuse et durant le nettoyage. Arrêter et débrancher l appareil du réseau électrique si vous ne l utilisez pas et avant de changer tout accessoire ou élément mobile, ainsi que durant le montage, le démontage ou le nettoyage. Si la fiche de l appareil est abîmée, elle doit être remplacée ; emmener l appareil à un Service d Assistance Technique agréé. Il est dangereux de
15 FR tenter de procéder aux réparations ou de démonter l appareil soi-même. Cet appareil est uniquement destiné à un usage domestique et non à un usage professionnel ou industriel. Avant de brancher l appareil au secteur, s assurer que la tension indiquée sur la plaque signalétique correspond à celle du secteur. Brancher l appareil sur une prise de courant raccordée à la terre et supportant au moins 10 ampères. La prise de courant (fiche) de l appareil doit coïncider avec le socle de la prise du secteur. Ne jamais modifier la fiche de l appareil. Ne pas utiliser d adaptateurs. L appareil doit être utilisé et placé sur une surface plane et stable. Ne pas utiliser l appareil si son câble électrique ou sa prise sont endommagés. Si une des enveloppes protectrices de l appareil se casse, débrancher immédiatement l appareil du secteur pour éviter toute décharge électrique. Ne pas utiliser l appareil s il est tombé, s il présente des signes visibles de dommages ou en présence de fuites. Ne pas forcer le câble électrique. Ne jamais utiliser le câble électrique pour soulever, transporter ou débrancher l appareil. Éviter que le câble électrique ne se coince ou ne s emmêle. Toujours vérifier l état du câble électrique. Les câbles endommagés ou emmêlés augmentent le risque de décharge électrique. Ne pas exposer l appareil à la pluie ou à un environnement humide. L eau qui entre dans l appareil augmente le risque de décharge électrique. Ne pas toucher la fiche de l appareil avec les mains mouillées. Prendre les précautions nécessaires pour éviter de mettre en marche involontairement l appareil. Avant d utiliser l appareil, s assurer que les lames sont correctement fixées à l appareil. Ne pas toucher les parties mobiles de l appareil quand il est en marche. Lorsque vous arrêterez l appareil, faites très attention, car la/les lame/s continueront de tourner par inertie. UTILISATION ET ENTRETIEN : Avant chaque utilisation, dérouler complètement le câble d alimentation de l appareil. Ne pas utiliser l appareil si ses accessoires ne sont pas correctement assemblés. Ne pas utiliser l appareil si les accessoires qui lui sont assemblés présentent des défauts. Le cas échéant, les remplacer immédiatement. Ne pas utiliser l appareil avec la verseuse vide. Ne pas utiliser l appareil si son dispositif de mise en marche/arrêt ne fonctionne pas. Ne pas faire bouger l appareil durant son fonctionnement Ne pas utiliser l appareil en position inclinée ni le retourner. Ne pas retourner l appareil quand il est en cours d utilisation ou branché au secteur. Ne pas forcer la capacité de travail de l appareil. Respecter le niveau MAX. Le volume de liquide chaud que vous rajouterez ne devra pas dépasser la moitié de la capacité de la verseuse ; et de toute façon, en présence de liquide chaud dans la verseuse, vous veillerez à n utiliser que la vitesse la plus lente. Conserver cet appareil hors de portée des enfants ou des personnes ayant des capacités physiques, sensorielles ou mentales réduites ou présentant un manque d expérience et de connaissances. NE VERSEZ JAMAIS d aliments très chauds ou bouillants dans la verseuse au risque de provoquer des brûlures. En outre, le changement brusque de température pourrait casser la verseuse. Utiliser cet appareil, ses accessoires et outils conformément au mode d emploi, en tenant compte des conditions de travail et du travail à réaliser. L utilisation de l appareil pour des opérations autres que celles pour lesquelles il a été conçu pourrait impliquer des situations dangereuses.
16 FR Ne jamais utiliser de liquides bouillants, ni d ingrédients dont la température est supérieure à 80ºC. Vérifier que le couvercle est parfaitement fermé avant de mettre l appareil en route. Ne jamais laisser l appareil branché sans surveillance. Vous réduirez par la même occasion la consommation d énergie et prolongerez la durée de vie de l appareil. Ne pas utiliser l appareil plus de 2 minutes consécutives. En cas de fonctionnement cyclique, toujours observer des périodes de repos de 30 secondes minimums entre chaque cycle. Veiller à n utiliser l appareil que le temps strictement nécessaire. Pour piler de la glace, ne pas introduire plus de 10 glaçons à la fois. Si vous souhaitez ajouter des glaçons, retirez le verre-doseur et introduisez les glaçons un par un. Ne pas utiliser l appareil avec des aliments surgelés ou des os. AVERTISSEMENT : Ne pas utiliser l appareil si le verre est fendu ou cassé. UTILISATION: Toute utilisation inappropriée ou non conforme aux instructions d utilisation annule la garantie et la responsabilité du fabricant. DESCRIPTION A Verre-doseur B Couvercle de la verseuse C Verseuse D Corps moteur E Kit de lames F Sélecteur de vitesse G Filtre pour jus H Enrouleur de câble Dans le cas où votre modèle ne disposerait pas des accessoires décrits antérieurement, ceux-ci peuvent être achetés séparément auprès des services d assistance technique. MODE D EMPLOI CONSIGNES PREALABLES: Assurez-vous que vous avez retiré tout le matériel d emballage du produit. Avant la première utilisation, laver les parties en contact avec les aliments comme indiqué à la section de nettoyage. MONTAGE DE LA VERSEUSE ET DU FILTRE Emboîtez la verseuse sur le corps principal. Pour cela, placez la verseuse (C) sur le corps (D) de manière à faire coïncider les parties saillantes de la verseuse avec les rainures du corps. Tournez la verseuse dans le sens des aiguilles d une montre jusqu à ce qu elle se bloque (Fig. 1) Vérifiez que la verseuse est correctement insérée dans le corps. Dans le cas contraire, l appareil ne démarrera pas. Si vous souhaitez utiliser le blender pour préparer des jus de fruits, placez le filtre (G) autour de la lame (E) (Fig. 2) UTILISATION: Dérouler complètement le câble avant de le brancher. Avant de placer le corps moteur, veillez à ce que l anneau de fixation des lames soit bien accouplé à la verseuse (en le tournant dans le sens contraire aux aiguilles d une montre). (Fig. 3) Placez la verseuse dans le corps-moteur et tournez-la dans le sens des aiguilles d une montre jusqu à entendre le «clic» indiquant qu elle est correctement en place. (Fig.1). Introduire les ingrédients après les avoir coupés en morceaux dans la verseuse avec du liquide (ne pas dépasser la marque du niveau maximum). Couvrir la verseuse avec le couvercle et s assurer qu il est bien ajusté. Placer le verre-doseur sur le couvercle. (Fig. 1) Brancher l appareil au secteur. Mettre en marche l appareil, en appuyant sur la commande. Sélectionnez la vitesse de votre choix et commencez à mixer. Vitesse P (position turbo), maintenez cette position pendant la durée que vous estimez nécessaire (au maximum 2 minutes de fonctionnement continu). Pendant le fonctionnement, maintenez fermement le couvercle avec les deux mains. Si vous souhaitez introduire davantage d ingrédients, retirez le verre-doseur.
17 FR Ajouter les ingrédients et replacer le verre-doseur. Ne jamais retirer le couvercle en cours de fonctionnement. Pour arrêter l appareil, sélectionner la vitesse 0. Pour éviter un démarrage trop brusque, nous recommandons de démarrer l appareil à la puissance minimum, et de l augmenter au fur et à mesure. REGLAGE ELECTRONIQUE DE LA VITESSE: Il est possible de régler la vitesse de l appareil en utilisant simplement la commande de contrôle de vitesse (F). Cette fonction est très utile puisqu elle permet d adapter la vitesse de l appareil au type de travail que vous voulez réaliser. APRES UTILISATION DE L APPAREIL: Arrêter l appareil, en plaçant la commande de sélection sur la position 0. Débrancher l appareil du secteur. Faites tourner la verseuse dans le sens contraire des aiguilles d une montre et enlevez-la du corps-moteur. Nettoyer l appareil. FONCTION TURBO L appareil fonctionne à pleine capacité pour assurer un rendement optimal. Sélectionner la vitesse P et maintenir cette position pendant la durée souhaitée. Ne pas utiliser l appareil plus de 2 minutes consécutives. NETTOYAGE DU FILTRE PRÉCAUTIONS: N utilisez jamais le filtre pour mixer des ingrédients à plus de 80ºC. Ne surchargez jamais le filtre. Avant de mettre en route l appareil, assurez-vous toujours que le couvercle est bien monté/fermé et que le verre-doseur est bien monté sur le couvercle. Coupez les fruits en petits morceaux avant de les introduire dans le filtre. Faites tremper les ingrédients secs tels que féculents ou graines de soja, avant de les introduire dans le filtre. MODE D EMPLOI: Le filtre évite que les pépins et les peaux des fruits se mélangent à la boisson. Une fois la verseuse (C) bien encastrée sur le corps moteur (A) (Fig. 1). Placer le filtre (G) autour de la lame (D) (Fig. 2). Assurez-vous que les rainures du filtre s encastrent parfaitement sur les nervures de l intérieur de la verseuse du blender. Couvrir la verseuse avec le couvercle. ATTENTION : Assurez-vous de placer le couvercle sur la verseuse de manière à ce que la boisson puisse être servie à travers le filtre du couvercle. Coupez les fruits en petits morceaux ou faites tremper les ingrédients secs avant de les introduire dans le filtre. Introduisez les ingrédients dans le filtre et versez de l eau ou un autre liquide dans la verseuse à travers l orifice du couvercle. Placer le verre-doseur sur le couvercle (Fig. 1). Brancher l appareil au secteur. Sélectionnez la vitesse de votre choix et commencez à mixer. REMARQUE : En cas de grandes quantités, nous recommandons de ne pas introduire tous les ingrédients dans le filtre en même temps. Commencez par une petite quantité et laissez fonctionner l appareil quelques secondes. Puis arrêtez l appareil et ajoutez une autre petite quantité, sans dépasser la partie supérieure de la grille du tamis. Répétez l opération jusqu à l introduction de tous les ingrédients. Laissez toujours le couvercle sur la verseuse de l appareil pendant qu il est en marche. APRÈS UTILISATION DU FILTRE: Éteignez l appareil et enlevez la verseuse du corps moteur. Servez la boisson à travers le bec de la verseuse, sans enlever le couvercle, ni le verre-doseur ni le filtre. Assurez-vous de placer le couvercle sur la verseuse de manière à ce que la boisson puisse être servie à travers le filtre du couvercle. Nettoyez le filtre immédiatement après utilisation.
18 FR NETTOYAGE Débrancher l appareil du secteur et attendre son refroidissement complet avant de le nettoyer. Nettoyer l appareil avec un chiffon humide imprégné de quelques gouttes de détergent et le laisser sécher. Ne pas utiliser de solvants ni de produits au ph acide ou basique tels qu eau de Javel, ni de produits abrasifs pour nettoyer l appareil. Ne pas laisser pénétrer d eau ni aucun autre liquide par les ouvertures d aération afin d éviter d endommager les parties intérieures de l appareil. Ne pas immerger l appareil dans l eau ou tout autre liquide, ni le passer sous un robinet. Durant le processus de nettoyage, faire particulièrement attention aux lames, car elles sont très coupantes. Il est recommandé de nettoyer l appareil régulièrement et de retirer tous les restes d aliments. Les pièces ci-dessous peuvent se laver à l eau chaude savonneuse ou au lave-vaisselle (en mode délicat) : - Verseuse (sans les lames). - Filtre. - Couvercle de la verseuse. - Verre-doseur. Veiller à bien placer les pièces dans le lave-vaisselle ou sur l égouttoir de l évier pour qu elles puissent s égoutter et se sécher correctement. Veillez à bien sécher toute les pièces avant de les monter ou de les ranger. FONCTION AUTONETTOYANTE : Versez de l eau et une petite quantité de détergent dans la verseuse. Sélectionnez l option «turbo». LAMES EXTRACTIBLES POUR UN NET- TOYAGE EFFICACE (UNIQUEMENT AVEC LE BLENDER A VERSEUSE): Desserrez l anneau de fixation des lames en le tournant dans le sens contraire aux aiguilles d une montre. (Fig.3). Retirez l anneau de fixation, la lame et le joint d étanchéité avant de débuter le nettoyage. Après avoir nettoyé l appareil, replacez la lame et faites tourner l anneau de fixation dans le sens contraire. ANOMALIES ET REPARATION En cas de panne, remettre l appareil à un service d assistance technique agréé. Il est dangereux de tenter de procéder aux réparations ou de démonter l appareil soi-même. POUR LES VERSIONS UE DU PRODUIT ET/ OU EN FONCTION DE LA LEGISLATION APPLICABLE DANS LE PAYS D UTILISATION: ÉCOLOGIE ET RECYCLAGE DU PRODUIT Les matériaux constitutifs de l emballage de cet appareil font partie d un programme de collecte, de tri et de recyclage. Si vous souhaitez vous débarrasser du produit, merci de bien vouloir utiliser les conteneurs publics appropriés à chaque type de matériau. Le produit ne contient pas de substances concentrées susceptibles d être considérées comme nuisibles à l environnement. Ce symbole signifie que si vous souhaitez vous débarrasser de l appareil, en fin de vie utile, celui-ci devra être déposé, en prenant les mesures adaptées, à un centre agréé pour la collecte et le tri des déchets d équipements électriques et électroniques (DEEE). Cet appareil est certifié conforme à la directive 2014/35/UE de basse tension, de même qu à la directive 2014/30/UE en matière de compatibilité électromagnétique, à la directive 2011/65/UE relative à la limitation de l utilisation de certaines substances dangereuses dans les équipements électriques et électroniques et à la directive 2009/125/CE pour la fixation d exigences en matière d écoconception applicable aux produits liés à l énergie.
19 DEUTSCH Sehr geehrte Kunden, Vielen Dank für Ihr Vertrauen in die Marke SO- LAC. Die Technologie, das Design und die Funktionalität dieses Produkts, das die anspruchsvollsten Qualitätsnormen erfüllt, werden Sie über viele Jahre zufriedenstellen. RATSCHLÄGE UND SICHER- HEITSHINWEISE Lesen Sie die Gebrauchsanweisung sorgfältig, bevor Sie das Gerät einschalten und bewahren Sie diese zum Nachschlagen zu einem späteren Zeitpunkt auf. Werden die Hinweise dieser Bedienungsanleitung nicht beachtet und eingehalten, kann es zu Unfällen kommen. Vor der Erstanwendung müssen die Einzelteile, die mit Nahrungsmitteln in Kontakt geraten, so wie im Absatz Reinigung beschrieben, gereinigt werden. Kinder dürfen dieses Gerät nicht benutzen. Das Gerät und seinen Netzanschluss stets außerhalb der Reichweite von Kindern halten. Dieses Gerät ist nicht geeignet für die Verwendung durch Personen mit eingeschränkter Wahrnehmung oder verminderten physischen oder geistigen DE Fähigkeiten oder einem Mangel an Erfahrung und Kenntnissen, sofern sie nicht durch eine für ihre Sicherheit verantwortliche Person beaufsichtigt oder bei der Bedienung angeleitet werden und die möglichen Gefahren verstehen. Dieses Gerät ist kein Spielzeug. Kinder müssen beaufsichtigt werden, damit sie nicht mit dem Gerät spielen. Seien Sie vorsichtig, wenn Sie heiße Flüssigkeiten in die Küchenmaschine oder Mixer gießen, da diese eine plötzliche Freisetzung von Dampf zu verursachen können. Die Messer sind sehr scharf und können Verletzungen verursachen. Gehen Sie vorsichtig mit ihnen um und vermeiden Sie den direkten Kontakt mit ihren Schneiden. Seien Sie besonders vorsichtig beim Handhaben der Messer beim Einsetzen und Abnehmen von Bauteilen, Leeren der Schüssel und bei der Reinigung. Schalten Sie das Gerät aus und ziehen Sie den Stecker aus dem Netz, wenn Sie das
20 DE Gerät unbeaufsichtigt lassen oder Zubehör oder bewegliche Teile auswechseln wollen, sowie vor der Montage, Demontage und der Reinigung. Wenn der Netzstecker beschädigt ist, muss er ausgetauscht werden. Bringen Sie das Gerät zu diesem Zweck zu einem zugelassenen Kundendienst. Um jegliche Gefahr auszuschließen, versuchen Sie nicht selbst, den Stecker abzumontieren und zu reparieren. Dieses Gerät ist ausschließlich für den häuslichen Gebrauch ausgelegt und ist für professionelle oder gewerbliche Zwecke nicht geeignet. Vergewissern Sie sich, dass die Spannung auf dem Typenschild mit der Netzspannung übereinstimmt, bevor Sie den Apparat an das Stromnetz anschließen. Das Gerät an ein Stromnetz mit mindestens 10 Ampere anschließen. Der Stecker des Geräts muss mit dem Steckdosentyp des Stromanschlusses übereinstimmen. Der Gerätestecker darf unter keinen Umständen modifiziert werden. Keine Adapter für den Stecker verwenden. Das Gerät muss auf einer ebenen und standfesten Oberfläche aufgestellt und benutzt werden. Das Gerät darf nicht mit beschädigtem elektrischem Kabel oder Stecker verwendet werden. Sollte ein Teil der Geräteverkleidung beschädigt sein, ist die Stromzufuhr umgehend zu unterbrechen, um einen möglichen elektrischen Schlag zu vermeiden. Das Gerät nicht benutzen, wenn es heruntergefallen ist, sichtbare Schäden aufweist oder undicht ist. Nicht mit Gewalt am elektrischen Anschlusskabel ziehen. Benutzen Sie das elektrische Kabel nicht zum Anheben oder Transportieren des Geräts. Den Stecker nicht am Kabel aus der Dose ziehen. Achten Sie darauf, dass das elektrische Kabel nicht eingeklemmt oder geknickt wird. Überprüfen Sie den Zustand des elektrischen Verbindungskabels. Beschädigte oder verwickelte Kabel erhöhen das Risiko von elektrischen Schlägen. Das Gerät niemals Regen oder Feuchtigkeit aussetzen. Wasser, das eventuell in das Gerät gelangt, erhöht die Elektroschockgefahr. Berühren Sie den Stecker nicht mit feuchten Händen. Treffen Sie die erforderlichen Maßnahmen, um ein unbeabsichtigtes Inbetriebsetzen des Geräts zu verhindern. Vor dem Gebrauch überprüfen, ob die Messer gut am Gerät befestigt sind. Bewegliche Teile des Geräts während dem Betrieb nicht berühren. Seien Sie nach dem Ausschalten des Gerätes vorsichtig und beachten Sie die durch die mechanische Trägheit verursachte Nachlaufzeit der/des Messers. BENUTZUNG UND PFLEGE: Vor jedem Gebrauch des Geräts das Stromkabel vollständig abwickeln. Gerät nicht benutzen, wenn Zubehör oder Ersatzteile nicht richtig befestigt sind. Gerät nicht benutzen, wenn die Zubehörteile mangelhaft sind. Ersetzen Sie diese sofort. Benützen Sie das Gerät nicht mit leerem Gefäß. Benützen Sie das Gerät nicht, wenn der An-/ Ausschalter nicht funktioniert. Das Gerät nicht bewegen, während es in Betrieb ist. Verwenden Sie das Gerät nicht im gekippten oder umgedrehten Zustand. Solange das Gerät in Betrieb oder ans Netz geschlossen ist, darf es nicht umgedreht werden. Betriebskapazität des Geräts nicht überbeanspruchen.
21 DE Bitte beachten Sie die MAX-Füllmenge. Das Gefäß nur bis zur Hälfte seiner maximalen Füllmenge mit heißen Flüssigkeiten befüllen. Heiße Flüssigkeiten im Gefäß nur mit der niedrigsten Geschwindigkeit verarbeiten. Das Gerät außerhalb der Reichweite von Kindern und/oder Personen mit eingeschränkten körperlichen, sensorischen oder geistigen Fähigkeiten bzw. Personen ohne ausreichende Erfahrung und Kenntnisse aufbewahren. Geben Sie NIEMALS sehr heisse oder kochende Lebensmittel in den Behälter, sie könnten sich während des Vorganges Verletzungen zufügen. Außerdem können abrupte Temperaturunterschiede zum Bruch des Behälters führen. Verwenden Sie dieses Gerät, seine Zubehörteile und seine Werkzeuge gemäß diesen Anleitungen und unter Berücksichtigung der Arbeitsbedingungen und der zu verrichtenden Arbeit. Der Gebrauch des Gerätes für andere als die vorgesehenen Zwecke kann gefährlich sein. Verwenden Sie niemals kochende Flüssigkeiten oder Zutaten, deren Temperatur über 80ºC liegt. Überprüfen Sie vor Inbetriebnahme des Geräts, ob der Deckel vollständig geschlossen ist. Das Gerät nie am Stromnetz angeschlossen und ohne Aufsicht lassen. Sie sparen dadurch Energie und verlängern die Gebrauchsdauer des Gerätes. Verwenden Sie das Gerät nicht länger als 2 Minuten am Stück. Beachten Sie immer die Ruhezeiten von mindestens30sekunden zwischen den Zyklen. Das Gerät sollte auf jeden Fall nicht länger als erforderlich in Betrieb sein. Für die Zerkleinerung von Eis sollten Sie nicht mehr als 10 Eiswürfel gleichzeitig verwenden. Wenn Sie mehr Eis hinzufügen möchten, entfernen Sie das Dosiergefäß und geben Sie dann die Eiswürfel einzeln hinein. Verwenden Sie das Gerät nicht mit tiefgefrorenen Lebensmitteln oder Knochen. WARNUNG: Das Gerät nicht benutzen, wenn das Glas Risse aufweist oder zerbrochen ist. BETRIEB: Unsachgemäße Verwendung bzw. Nichteinhaltung der Gebrauchsanweisung kann Gefahren zur Folge haben und führt zum Erlöschen der Garantieansprüche sowie der Haftung des Herstellers. BEZEICHNUNG A Dosiergefäß B Krugdeckel C Gefäß D Motorblock E Messerset F Geschwindigkeitswahlschalter G Saftfilter H Kabelrolle Wenn Sie meinen, dass das Gerät nicht mit dem oben angeführten Zubehör ausgestattet ist, können Sie die Teile auch einzeln beim Technischen Dienst erwerben. BENUTZUNGSHINWEISE VOR DER BENUTZUNG: Vergewissern Sie sich, dass Sie das gesamte Verpackungsmaterial des Produkts entfernt haben. Vor der Erstanwendung müssen die Einzelteile, die mit Nahrungsmitteln in Kontakt geraten, so wie im Absatz Reinigung beschrieben, gereinigt werden. MONTAGE VON KANNE UND FILTER Setzen Sie den Becher auf den Sockel. Hierfür stellen Sie den Behälter (C) so auf das Gehäuse (D), dass die Vorsprünge des Behälters in die Einkerbungen des Gehäuses einrasten. Drehen Sie den Behälter im Uhrzeigersinn, bis er vollständig einrastet (Fig 1). Stellen Sie sicher, dass der Behälter richtig eingerastet ist. Andernfalls lässt sich das Gerät nicht in Betrieb nehmen. Wenn Sie den Mixer als Saftpresse verwenden möchten, so setzten Sie den Filter (G) um das Messer (E) ein (Fig. 2) BENUTZUNG: Vor Anschluss das Kabel völlig ausrollen. Vergewissern Sie sich, dass der Befestigungsring der Messer fest im Gefäß sitzt (indem Sie ihn gegen den Uhrzeigersinn drehen), bevor Sie das Gefäß auf die Motoreinheit setzen. (Fig. 3) Setzen Sie das Gefäß auf die Motoreinheit und drehen Sie es im Uhrzeigersinn. Es ist in der
REFERENCE: MTF4 CODIC:
 MARQUE: PROLINE REFERENCE: MTF4 CODIC: 3523551 MTF4 AVERTISSEMENTS Cet appareil est destiné à un usage domestique uniquement. Toute utilisation autre que celle prévue pour cet appareil, ou pour une autre
TCNF 185 TCNF 185 IX NO-FROST FRIGORÍFICO
 TCNF 185 TCNF 185 IX NO-FROST FRIGORÍFICO ATTENTION Cet appareil est destiné à un usage domestique uniquement. Toute utilisation autre que celle prévue pour cet appareil, ou pour une autre application
BEDIENUNGS- UND SICHERHEITSHINWEISE 3 OPERATION AND SAFETY NOTES 19 UNITÀ PRINCIPALE LP PLUS INDICAZIONI PER L USO E PER LA SICUREZZA 47
 DE LADEGERÄT LP PLUS BEDIENUNGS- UND SICHERHEITSHINWEISE 3 GB MAIN UNIT LP PLUS OPERATION AND SAFETY NOTES 19 FR UNITÉ PRINCIPALE LP PLUS INSTRUCTIONS D UTILISATION ET CONSIGNES DE SÉCURITÉ 33 IT UNITÀ
MOD. BV5713 ةيبرعلا ةغللا اميلعت. Solac is a registered Trade Mark BATIDORA INSTRUCCIONES DE USO MIXER SE SKLENĚNOU NÁDOBOU NÁVOD K POUZITÍ
 MOD. BV5713 BATIDORA INSTRUCCIONES DE USO JAR BLENDER INSTRUCTIONS FOR USE MIXEUR MODE D EMPLOI MIXGERÄT GEBRAUCHSANLEITUNG BATEDOR INSTRUÇÕES DE USO FRULLATORE ISTRUZIONI PER L USO MIXER GEBRUIKSAANWIJZING
Litosil - application
 Litosil - application The series of Litosil is primarily determined for cut polished floors. The cut polished floors are supplied by some specialized firms which are fitted with the appropriate technical
USER'S MANUAL FAN MOTOR DRIVER FMD-02
 USER'S MANUAL FAN MOTOR DRIVER FMD-02 IMPORTANT NOTE: Read this manual carefully before installing or operating your new air conditioning unit. Make sure to save this manual for future reference. FMD Module
UŽIVATELSKÁ PŘÍRUČKA
 UŽIVATELSKÁ PŘÍRUČKA Plni víry a naděje míříme kupředu. S odhodláním zlepšujeme své dovednosti. Zapomeňte na zklamání, ale nikoli na svůj nevyužitý potenciál. Touha překonat sám sebe a dosáhnout hranice
PLASTICPARTS. -Parts not for use. -Teile werden nicht verwendet. -Pieces a ne pas utiliser. -Tyto díly nepoužívejte při stavbě. -
 742 SpitfireMk.VI 1/72 A> 70120 A PLASTICPARTS B> 70120 B C> 70120 C D> F> E> 70120 D 70120 E GUNZE 70120 F H4 C4 YELLOW H12 H13 C3 FLAT RED H33 C81 RUSSET H51 C11 LIGHT GULL GRAY H71 C21 MIDDLE STONE
Uživatelská příručka. USB Charger UCH20
 Uživatelská příručka USB Charger UCH20 Obsah Úvod...3 USB Charger popis... 3 Používání nabíječky USB... 4 Nabíjení zařízení... 4 Právní informace... 5 Declaration of Conformity...6 2 Úvod USB Charger popis
SPECIFICATION FOR ALDER LED
 SPECIFICATION FOR ALDER LED MODEL:AS-D75xxyy-C2LZ-H1-E 1 / 13 Absolute Maximum Ratings (Ta = 25 C) Parameter Symbol Absolute maximum Rating Unit Peak Forward Current I FP 500 ma Forward Current(DC) IF
ROLZ-2. Portable AV/Conference Center. Assembly Instructions
 1 ROLZ-2 Portable AV/Conference Center Assembly Instructions Rolz-2 Portable AV/Conference Center Part Drawing Description Qty Part Drawing Description Qty Hardware List A 1 ½ Flat Head Screw 2 EA P-1
HU - HASZNÁLATI ÚTMUTATÓ CZ - NÁVOD K POUŽITÍ SK - NÁVOD NA POUŽITIE PL - INSTRUKCJA OBSŁUGI
 ES - MANUAL DE INSTRUCCIONES PT - MANUAL DE INSTRUÇÕES EN - INSTRUCTIONS FOR USE FR - MANUEL D UTILISATION DE - GEBRAUCHSANWEISUNG IT - MANUALE DI ISTRUZIONI EL - ENTYÐÏ ÏÄÇÃÉÙN HU - HASZNÁLATI ÚTMUTATÓ
Hanriot HD.2 PLASTIC PARTS. Mr.METAL COLOR METALLICS
 8413 1/48 Hanriot HD.2 PLASTIC PARTS A> 3 B> 1 2 13 5 23 7 6 9 8 12 25 7 9 5 15 15 14 21 29 28 31 30 37 36 35 34 4 12 20 11 6 17 16 8 38 24 25 4 3 26 20 2 17 11 10 27 28 14 13 33 27 26 32 19 18 10 22 1
DATA SHEET. BC516 PNP Darlington transistor. technický list DISCRETE SEMICONDUCTORS Apr 23. Product specification Supersedes data of 1997 Apr 16
 zákaznická linka: 840 50 60 70 DISCRETE SEMICONDUCTORS DATA SHEET book, halfpage M3D186 Supersedes data of 1997 Apr 16 1999 Apr 23 str 1 Dodavatel: GM electronic, spol. s r.o., Křižíkova 77, 186 00 Praha
EU CONDICIONES PARA EXPOSITORES PODMÍNKY ÚČASTI
 WINE FESTIVAL wines and food from EU countries VINNÝ FESTIVAL vína a produkty zemí EU CONDICIONES PARA EXPOSITORES PODMÍNKY ÚČASTI Praha 27. a 28. března 2015 Condiciones A cumplir en el lugar de celebración
Mechanika Teplice, výrobní družstvo, závod Děčín TACHOGRAFY. Číslo Servisní Informace Mechanika: 5-2013
 Mechanika Teplice, výrobní družstvo, závod Děčín TACHOGRAFY Servisní Informace Datum vydání: 20.2.2013 Určeno pro : AMS, registrované subj.pro montáž st.měř. Na základě SI VDO č./datum: Není Mechanika
Tento materiál byl vytvořen v rámci projektu Operačního programu Vzdělávání pro konkurenceschopnost.
 Tento materiál byl vytvořen v rámci projektu Operačního programu Vzdělávání pro konkurenceschopnost. Projekt MŠMT ČR Číslo projektu Název projektu školy Klíčová aktivita III/2 EU PENÍZE ŠKOLÁM CZ.1.07/1.4.00/21.2146
L-force Drives. EDK84DGFCxxxx.O=I. Ä.O=Iä. Montážní návod motec. E84DGFCxxxx. Komunikační modul Communication unit
 EDK8DGFCxxxx.O=I Ä.O=Iä L-force Drives Montážní návod 800 motec E8DGFCxxxx Komunikační modul Communication unit 0 0.7 kw 7.kW E8DG0a E8DG0b EDK8DGFCxxxx CS.0 V Warnings! Operation of this equipment requires
Easy-6 Pivottür mit Seitenwand / Otočné dveře s boční stěnou
 Easy-6 Pivottür mit Seitenwand / Otočné dveře s boční stěnou Lesen Sie die Bedienungsanleitung sorgfältig durch und bewahren Sie diese für den späteren Gebrauch auf. Wir empfehlen die Montage unseres Produktes
Light (glass base with power cord and Ehmann dimmer, reflector, glass globe), light source, cotton gloves, installation manual
, light source, cotton gloves, installation manual") Package contents Name: BALLOONS PC858 Table light 607 850 Components included with unit: Light (glass base with power cord and Ehmann dimmer, reflector, glass globe), light source, cotton gloves, installation
Package contents Name: BALLOONS PC858 Table light 607 850 Components included with unit: Light (glass base with power cord and Ehmann dimmer, reflector, glass globe), light source, cotton gloves, installation
2N Voice Alarm Station
 2N Voice Alarm Station 2N Lift1 Installation Manual Version 1.0.0 www.2n.cz EN Voice Alarm Station Description The 2N Voice Alarm Station extends the 2N Lift1/ 2N SingleTalk with an audio unit installed
MARQUE: CANDY REFERENCE: CI 640 CB CODIC:
 MARQUE: CANDY REFERENCE: CI 640 CB CODIC: 4308867 NOTICE Instruction Manual For Induction Hob Table De Cuisson Induction Návod k použití pro indukní varnou desku Brugervejledning til induktionskogetop
Téma: Les boissons VY_32_INOVACE_292
 Téma: Les boissons Autor: Číslo projektu: Mgr. Michaela Bašná CZ.1.07/1.5.00/34.1072 Ročník: 2. 3. Obor vzdělávání: Vzdělávací oblast: Tematický okruh: hotelnictví jazykové vzdělávání odborná slovní zásoba
ČSN EN ISO OPRAVA
 ICS 11.040.70 ČSN EN ISO 11981 OPRAVA 1 19 5208 Září 2009 ČESKÁ TECHNICKÁ NORMA Oční optika Kontaktní čočky a prostředky pro ošetřování kontaktních čoček Stanovení fyzikální kompatibility prostředků pro
 11.12. 100 ΕΙΣΟΔΟΣ = E / ENTRANCE = E = = 1174 550 ΤΥΠΟΠΟΙΗΜΕΝΟ ΚΥ = 2000 (ΕΠΙΛΟΓΗ: 2100) / CH STANDARD = 2000 (OPTIONAL: 2100) 243 50 ΚΥ/CH + 293 ΚΥ/CH +103 100 ΚΥ /CH 6 11 6 20 100 0,25 ΚΑ (CO) + 45
WICHTIG - FÜR SPÄTERE VERWENDUNG AUFBEWAHREN - SORGFÄLTIG LESEN.
 WICHTIG - FÜR SPÄTERE VERWENDUNG AUFBEWAHREN - SORGFÄLTIG LESEN. Ignorierung der Warnungen und Hinweise in der Gebrauchsanleitung können zu ernsten Verletzungen und Todesfällen führen. Achtung: Zur Vermeidung
GUIDELINES FOR CONNECTION TO FTP SERVER TO TRANSFER PRINTING DATA
 GUIDELINES FOR CONNECTION TO FTP SERVER TO TRANSFER PRINTING DATA What is an FTP client and how to use it? FTP (File transport protocol) - A protocol used to transfer your printing data files to the MAFRAPRINT
CORTAFIAMBRES / FIAMBREIRA / FOOD SLICER / ALLESSCHNEIDER
 portada.qxd 20/5/04 15:17 Página 1 ES - MANUAL DE INSTRUCCIONES PT - MANUAL DE INSTRUÇÕES EN - NSTRUCTIONS FOR USE FR - MANUEL D UTILISATION DE - GEBRAUCHSANWEISUNG IT - MANUALE DI ISTRUZIONI EL - ENTY
eduard WEEKEND EDITION
 3741 1:35 Pz.Kpfw. VI Ausf.B Tiger II PLASTIC PARTS A> B> C> D> eduard WEEKEND EDITION E> F> G> 2 pcs. H> 2 pcs. -Parts not for use. -Teile werden nicht verwendet. -Pieces a ne pas utiliser. -Tyto díly
Hi-Res Audio/DNC Headset MDR-NC750
 Uživatelská příručka Hi-Res Audio/DNC Headset MDR-NC750 Obsah Začínáme...3 Úvod...3 Přehled... 3 Základy práce...4 Nošení náhlavní soupravy...4 Připojení náhlavní soupravy k vašemu zařízení... 4 Nastavení
2N LiftIP. Voice Alarm Station. Communicator for Lifts. Version
 2N LiftIP Communicator for Lifts Voice Alarm Station Version 2.4.0 www.2n.cz Description The 2N Voice Alarm Station is a switch that helps you extend 2N LiftIP with one or more audio units installed on
 [KLICK] GB Instruction Manual POWERLINE 4 LIGHT FOREWORD Dear Customer, Thank you for purchasing the POWERLINE 4 LIGHT charger. These operating instructions will help you to get the best from your charger.
Manuel d'utilisation 4 Pokyny pro uživatele 5
 Manuel d'utilisation 4 Pokyny pro uživatele 5 4 2 1 3 7 5 6 1 : Interrupteur marche / arrêt - Hlavní vypínač Zapnuto/Vypnuto L interrupteur principal de la S8 LAN TV permet la mise sous tension et l arrêt
WORKSHEET 1: LINEAR EQUATION 1
 WORKSHEET 1: LINEAR EQUATION 1 1. Write down the arithmetical problem according the dictation: 2. Translate the English words, you can use a dictionary: equations to solve solve inverse operation variable
N>Nmax ON/OFF ON OFF ON,OFF,ON/OFF ON/OFF OFF 11-14. Nmax =15. t=6sec. MIR (N) (N) Rz 11 L1 (AC 230 V) L1 (AC 230 V) OD-MIR-BK OFF (OFF)
 (N) Rz 11 L1 (AC 230 V) L1 (AC 230 V) OD-MIR-BK OFF (OFF)") N AC 230V 1... AC 230V A1 N AC5a 2A AC1 16A Nmax =15 N = N N>Nmax 0x /h L 60 AC 230V OD-MIR-BK ax AC-1 In 16A Un 230V m N MIR 12 14 AC5a 12 14,, P>300W t=6sec. 12 14 (N) (N) 12 14 Rz 12 14 Rz () (AC 230
N AC 230V 1... AC 230V A1 N AC5a 2A AC1 16A Nmax =15 N = N N>Nmax 0x /h L 60 AC 230V OD-MIR-BK ax AC-1 In 16A Un 230V m N MIR 12 14 AC5a 12 14,, P>300W t=6sec. 12 14 (N) (N) 12 14 Rz 12 14 Rz () (AC 230
EINBAUANWEISUNG FÜR SCHALLDÄMM-SET BWS/DWS MONTÁŽNÍ NÁVOD PRO ZVUKOVĚ IZOLAČNÍ SOUPRAVY BWS/DWS
 EINUNWEISUNG FÜR SCHLLÄMM-SET WS/WS MONTÁŽNÍ NÁVO PRO ZVUKOVĚ IZOLČNÍ SOUPRVY WS/WS Wichtige Hinweise - unbedingt beachten! ůležitá upozornění bezpodmínečně dodržujte! Schalldämm-Set muss vollständig und
1. Usazení do podlahy * 2. Usazení na podlahu * 3. Usazení podezdním s pomocí nožiek * 4. Usazení s pomocí panelu *
 SPRCHOVÉ VANIKY * SHOWER TRAYS * DUSCHTASSEN * SPRCHOVACIE VANIKY * ZUHANYTÁLCÁK *DUŠO PADKLAI montážní návod * installation instructions * montageanleitung *montážny návod * szerelési utasítás * nontavimo
ROLZ-2. Portable AV/Conference Center. Assembly Instructions
 1 ROLZ-2 Portable AV/Conference Center Assembly Instructions Rolz-2 Portable AV/Conference Center Part Drawing Description Qty Part Drawing Description Qty Hardware List A 1 ½ Flat Head Screw 2 EA P-1
Uživatelská příručka. Xperia P TV Dock DK21
 Uživatelská příručka Xperia P TV Dock DK21 Obsah Úvod...3 Přehled zadní strany stanice TV Dock...3 Začínáme...4 Správce LiveWare...4 Upgradování aplikace Správce LiveWare...4 Použití stanice TV Dock...5
S310 PŘÍDAVNÁ MLHOVÁ SVĚTLA HALOGEN H3 55W 12V
 N Descrizione Caratteristiche Codice Quantità Mlhová světla halogen - - 2 (Dx,Sx) 2 Přepínač - 3 Objímka světla - - 2 4 Objímka přepínače - - 5 Úchyt - - 4 6 Šroub M6-2 7 Šroub samořezný - - 2 8 Krytka
INSTALAČNÍ NÁVOD OPERATING INSTRUCTION
 LED PRODISC II + LED PRODISC II MINI + LED PRODISC II MAXI INSTALAČNÍ NÁVOD OPERATING INSTRUCTION 4000944x 4000945x 4000940x 4000941x 4000946x 4000947x Prodisc II Mini Prodisc II Mini + MW senzor Prodisc
STAVEBNÍ PŘIPRAVENOST GILOTINA VLO DIMENSIONAL SHEET VLO MASSBLATT VERTIKALER BESCHLAG VLO МОНТАЖ МЕТАЛЛОКОНСТРУКЦИИ ВОРОТ СИСТЕМЫ ГИЛЬОТИНА ВЛО
 CZ VOLNÝ PROSTOR PRO POHYBUJÍCÍ SE VRATA EN FREE SPACE FOR THE DOORMOVEMENT DE FREIRAUM FÜR DIE BEWEGUNGSABLÄUFE RU РАЗМЕРЫ НЕОБХОДИМЫЕ ДЛЯ УСТАНОВКИ ВОРОТ CZ A - šířka otvoru B - výška otvoru C - nadpraží
1-AYKY. Instalační kabely s Al jádrem. Standard TP-KK-133/01, PNE 347659-3. Konstrukce. Použití. Vlastnosti. Installation cables with Al conductor
 Instalační kabely s Al jádrem Installation cables with Al conductor Standard TP-KK-133/01, PNE 347659-3 4 3 2 1 Konstrukce Construction 1 Hliníkové jádro Aluminium conductor 2 Izolace PVC 3 Výplňový obal
Ecosun CH. Napětí V. 1096x155x115* 230 V 1N I IP 44 Ecosun CH x155x115*
 Návod k obsluze a montáži N631/R02 (06.08.14 ) Ecosun CH Sálavé panely do kostelních lavic 1. Použití Sálavé panely Ecosun CH jsou určeny k instalaci pod pevně připevněné kostelní lavice. Panely se instaluji
UPM3 Hybrid Návod na ovládání Čerpadlo UPM3 Hybrid 2-5 Instruction Manual UPM3 Hybrid Circulation Pump 6-9
 www.regulus.cz UPM3 Hybrid Návod na ovládání Čerpadlo UPM3 Hybrid 2-5 Instruction Manual UPM3 Hybrid Circulation Pump 6-9 CZ EN UPM3 Hybrid 1. Úvod V továrním nastavení čerpadla UPM3 Hybrid je profil PWM
Aufbauanleitung. notice de montage. Building Instructions. montagehandleiding. Instrucciones de construcción. Istruzioni per il montaggio
 70336 19.10.2016 Aufbauanleitung notice de montage Building Instructions montagehandleiding Instrucciones de construcción Istruzioni per il montaggio Montážní návod Service-Hotline:+49 421 38693 33 Vergleichen
SERVICE ADVISORY SA-5A
 V510 PROPELLER TYPE SERIES REPLACEMENT OF BLADE BEARING SEAL VRTULE TYPOVÉ ŘADY V510 VÝMĚNA TĚSNÍCÍ MANŽETY ULOŽENÍ LISTU 1. GENERAL A. This document provides disassembly and assembly procedure in the
USER'S MANUAL FAN MOTOR DRIVER FMD-01, FMD-03
 USER'S MANUAL FAN MOTOR DRIVER FMD-01, FMD-03 IMPORTANT NOTE: Read this manual carefully before installing or operating your new air conditioning unit. Make sure to save this manual for future reference.
Deutsch. Einstellhilfe Einachser. Grundsätzlich sollten die Seilzugeinstellungen immer 1 x im Jahr nachgeprüft werden. Einstellhilfe Kupplung
 Deutsch Einstellhilfe Einachser Grundsätzlich sollten die Seilzugeinstellungen immer 1 x im Jahr nachgeprüft werden. Einstellhilfe Kupplung Die Kupplung ist vom Werk aus grundeingestellt. 2. Ganghebel
GRAND KANCELÁŘSKÉ STOLY DR2 1800 * 900 DR2 1800 * 900 DR1 1600 * 800 DR1 1600 * 800 DZ 1600 * 900 DZ 1600 * 900 SKLADEBNOST SYSTÉMU GRAND
 KANCELÁŘSKÉ STOLY PRAVÁ SESTAVA F SKLADEBNOST SYSTÉMU GRAND LEVÁ SESTAVA F D D C C PŘÍSEDOVÉ VARIANTY NESENÉ NA VYLOŽENÉ KONZOLE PODNOŽE B E B E A A DR2 1 * DR2 1 * DR1 * DZ * DR1 * DZ * DESKY ZÁKLADNÍ
ČSN EN ed. 2 OPRAVA 1
 ČESKÁ TECHNICKÁ NORMA ICS 31.060.10 Říjen 2016 Neproměnné kondenzátory pro použití v elektronických zařízeních Část 14: Dílčí specifikace Neproměnné kondenzátory pro elektromagnetické odrušení a pro připojení
Manuel d'utilisation 4 Pokyny pro uživatele 5
 Manuel d'utilisation 4 Pokyny pro uživatele 2 1 4 3 6 1 : Interrupteur marche / arrêt - Hlavní vypínač Zapnuto/Vypnuto L interrupteur principal de la S LAN permet la mise sous tension et l arrêt des prises.
Střední průmyslová škola strojnická Olomouc, tř.17. listopadu 49
 Střední průmyslová škola strojnická Olomouc, tř.17. listopadu 49 Výukový materiál zpracovaný v rámci projektu Výuka moderně Registrační číslo projektu: CZ.1.07/1.5.00/34.0205 Šablona: III/2 Anglický jazyk
RIMINI. Samozavírací hydraulické závěsy Self-closing hydraulic hinges
 3 RIMINI Samozavírací hydraulické závěsy Self-closing hydraulic hinges Bartosini s.r.o. Kancelář: Karvinská 1897, 737 01 Český Těšín tel.: +420 602 322 276; e-mail: bartosini@bartosini.cz WWW.BARTOSINI.CZ
VESTAVBOVÝ RÁM - ROLLO JUMBO
 VESTAVBOVÝ RÁM - ROLLO JUMBO Montageanleitung / Mounting Instruction / Montážní návod Nur von Erwachsenen zu bedienen! Kinder nicht an der Bildwand spielen lassen! Operation by adults only! Do not let
CZ.1.07/1.5.00/34.0527
 Projekt: Příjemce: Digitální učební materiály ve škole, registrační číslo projektu CZ.1.07/1.5.00/34.0527 Střední zdravotnická škola a Vyšší odborná škola zdravotnická, Husova 3, 371 60 České Budějovice
Training Board TB series 3. SolderBoard
 Training Board TB series 3 SolderBoard Elektronická stavebnice SOLDERBOARD byla speciálně navržena pro účely praktické výuky ručního osazování a pájení desek plošných spojů v technologii SMT. Je levným
2N LiftIP. IO Extender. Communicator for Lifts. Version
 2N LiftIP Communicator for Lifts IO Extender Version 2.4.0 www.2n.cz Description The IO extender helps you extend 2N LiftIP with 1 input and 2 outputs. The purpose of the input is to cancel the rescue
TECHNICKÝ LIST řada mechanických odvaděčů kondenzátu AUTODRAIN TECHNICAL DATA SHEET for mechanical autodrain equipment AUTODRAIN
 Popis: Nádoba s mechanickým plovákem k odstraňování pevných nečistot, vody, aerosolů, uhlovodíků, prachu oddělených separátory KING AIR se systémem stlačeného vzduchu. Rozdělení dle využití instalace:
Střední průmyslová škola strojnická Olomouc, tř.17. listopadu 49
 Střední průmyslová škola strojnická Olomouc, tř.17. listopadu 49 Výukový materiál zpracovaný v rámci projektu Výuka moderně Registrační číslo projektu: CZ.1.07/1.5.00/34.0205 Šablona: III/2 Anglický jazyk
ČSN EN ISO OPRAVA
 ICS 17.060; 71.040.20 ČSN EN ISO 8655-6 OPRAVA 1 70 4255 Srpen 2009 ČESKÁ TECHNICKÁ NORMA Pístové titrační přístroje Část 6: Gravimetrická metoda zkoušení Úřad pro technickou normalizaci, metrologii a
Informace o písemných přijímacích zkouškách. Doktorské studijní programy Matematika
 Informace o písemných přijímacích zkouškách (úplné zadání zkušebních otázek či příkladů, které jsou součástí přijímací zkoušky nebo její části, a u otázek s výběrem odpovědi správné řešení) Doktorské studijní
Návod k obsluze a montáži N129/R04 (10.03.14 ) SUŠÁK NA RUCE
 SUŠÁK NA RUCE") Návod k obsluze a montáži N129/R04 (10.03.14 ) SUŠÁK NA RUCE Čtěte prosím pozorně informace uvedené v tomto návodu, který obsahuje důležité pokyny pro bezpečnou montáž, použití a údržbu jednotky. Uchovávejte
Návod k obsluze a montáži N129/R04 (10.03.14 ) SUŠÁK NA RUCE Čtěte prosím pozorně informace uvedené v tomto návodu, který obsahuje důležité pokyny pro bezpečnou montáž, použití a údržbu jednotky. Uchovávejte
User manual SŘHV Online WEB interface for CUSTOMERS June 2017 version 14 VÍTKOVICE STEEL, a.s. vitkovicesteel.com
 1/ 11 User manual SŘHV Online WEB interface for CUSTOMERS June 2017 version 14 2/ 11 Contents 1. MINIMUM SYSTEM REQUIREMENTS... 3 2. SŘHV ON-LINE WEB INTERFACE... 4 3. LOGGING INTO SŘHV... 4 4. CONTRACT
Size / Světlost : DN 1/4 to 4 / DN 1/4 až 4
 Size / Světlost : 1/4 to 4 / 1/4 až 4 Ends / Konce : Threaded BSP / Závitové BSP Min. Temperature / Minimální teplota : -20 C Max. Temperature / Maximální teplota : +180 C Max. Pressure / Maximální tlak
Quick Start Guide. Clear. Rychlý průvodce nastavením
 CZ EN Quick Start Guide Clear Rychlý průvodce nastavením Measurement Měření Před Fully prvním charge použitím the blood plně pressure dobijte monitor baterii before přístroje. first use. 1 Rest your bare
Bf 108 B> 5 4 GUNZE. Mr.METAL COLOR SM01 MMC-001 SUPER CHROME. Mr.COLOR METALLIC
 Bf 108 8479 1/48 PLASTIC PARTS A> 3 B> 5 4 15 7 1 6 7 14 11 9 8 15 14 17 1 0 1 1 18 19 6 10 1 11 3 11 10 C> 1 6 7 3 4 8 9 10 10 14 11 15 17 18 19 1 0 19 3 D> 5 8 9 7 9 8 4 GUNZE H C H11 C6 H1 C33 H15 C65
PODZEMNÍ KONTEJNERY - CITY CITY UNDERGROUND CONTAINERS CITY UNTERIRDISCHER CONTAINER CONTENEURS CITY ENTERRES
 PODZEMNÍ KONTEJNERY - CITY CITY UNDERGROUND S CITY UNTERIRDISCHER CONTENEURS CITY ENTERRES Všechny typy kontejnerů jsou zhotoveny z vysoce kvalitních materiálů se špičkovým povrchem. Kovové vhazovací sloupky
Střední odborná škola a Střední odborné učiliště, Chrudim, Čáslavská 205 20.
 Klíčová slova: 20. Text: Keywords: sparkling wine, champagne, glasses, service Service of sparkling wines 1. The Inventory for sparkling wine service - Wine cooler it cools the beverage; ice, water and
Začínáme. Entfernen Sie beide Seitenteile und die Gehäuseoberseite. Remove both side panels and the case top. Odstraňte oba boční a horní panel.
 Začínáme Entfernen Sie beide Seitenteile und die Gehäuseoberseite. Remove both side panels and the case top. Odstráňte oba bočné a horný panel. Odstraňte oba boční a horní panel. Entfernen Sie die Frontblende,
Roger AudioHub. User Guide / Gebrauchsanweisung Mode d emploi / Uživatelská příručka
 Roger AudioHub User Guide / Gebrauchsanweisung Mode d emploi / Uživatelská příručka 2 Components and functions Komponenten und Funktionen Composants et fonctions Komponenty a funkce Roger AudioHub a b
Číslo materiálu: VY 32 INOVACE 25/12. Název materiálu: Anatomy 2 - Senses Číslo projektu: CZ.1.07/1.4.00/
 Číslo materiálu: Název materiálu: Anatomy 2 - Senses Číslo projektu: CZ.1.07/1.4.00/21.1486 Zpracoval: Jana Jourová Anatomy 2 - Senses 1. Before you watch the videos, try to answer the questions. How many
E1 Bauteile Components Pièces Součásti
 PS300 Einbau-Anleitung Installation Instructions Instructions de montage Montážní návod E1 Bauteile Components Pièces Součásti 1 4 2 1 = Magnetventil Solenoid valve Vanne magnétique Selenoidový ventil
Projekt: ŠKOLA RADOSTI, ŠKOLA KVALITY Registrační číslo projektu: CZ.1.07/1.4.00/21.3688 EU PENÍZE ŠKOLÁM
 ZÁKLADNÍ ŠKOLA OLOMOUC příspěvková organizace MOZARTOVA 48, 779 00 OLOMOUC tel.: 585 427 142, 775 116 442; fax: 585 422 713 email: kundrum@centrum.cz; www.zs-mozartova.cz Projekt: ŠKOLA RADOSTI, ŠKOLA
PASSÉ COMPOSÉ MINULÝ ČAS SLOŽENÝ prezentace
 VY_32_INOVACE_FJ_144 PASSÉ COMPOSÉ MINULÝ ČAS SLOŽENÝ prezentace Mgr. Martina Šenkýřová Obchodní akademie, Lysá nad Labem, Komenského 1534 Dostupné z www.oalysa.cz. Financováno z ESF a státního rozpočtu
Czech Republic. EDUCAnet. Střední odborná škola Pardubice, s.r.o.
 Czech Republic EDUCAnet Střední odborná škola Pardubice, s.r.o. ACCESS TO MODERN TECHNOLOGIES Do modern technologies influence our behavior? Of course in positive and negative way as well Modern technologies
Qualität aus erster Hand! Sie haben sich für ein Markenprodukt der Firma Zangenberg entschieden.
 Qualität aus erster Hand! Sie haben sich für ein Markenprodukt der Firma Zangenberg entschieden. Bitte lesen Sie die Anleitung vor der ersten Benutzung aufmerksam durch. Sie erhalten wichtige Hinweise
Transportation Problem
 Transportation Problem ١ C H A P T E R 7 Transportation Problem The transportation problem seeks to minimize the total shipping costs of transporting goods from m origins (each with a supply s i ) to n
SERVISNÍ MANUÁL PEGAS 250 E CEL OVO SERVICE MANUAL PEGAS 250 E CEL OVO
 MG136-1 PEGAS 250 E CEL OVO SERVICE MANUAL page 1 SERVISNÍ MANUÁL PEGAS 250 E CEL OVO SERVICE MANUAL PEGAS 250 E CEL OVO 1. VAROVÁNÍ WARNING UPOZORNĚNÍ Pouze osoba splňující kvalifikaci danou zákonem je
Assembly Instructions, Montageanleitung, Montážní návod HB-S
 Assembly Instructions, Montageanleitung, Montážní návod HB-S A-44pcs B1-30pcs B2-12pcs B3-8pcs B4-4pcs C-2pcs D-2pcs E-1pc G - 4pcs F-1pc H-4pcs Bech dogs, Bankhaken, Poděráky 8x40 mm 4x20mm 7x50mm 6x30mm
Výměna za variantu s přenosným termostatem.
 Výměna za variantu s přenosným termostatem. Videoprůvodce instalací a seznam kompa bilních kotlů najdete zde: h ps://www.netatmo.com/video VAROVÁNÍ Varování! Před instalací si velmi pozorně přečtěte následující
VY_22_INOVACE_60 MODAL VERBS CAN, MUST
 VY_22_INOVACE_60 MODAL VERBS CAN, MUST Vzdělávací oblast: Jazyk a jazyková komunikace Vzdělávací obor: Anglický jazyk Ročník: 9. MODAL VERBS CAN, MUST, SHOULD 1/ Connect the verbs to their future forms.
Název společnosti: VPK, s.r.o. Vypracováno kým: Ing. Michal Troščak Telefon: Datum:
 Pozice Počet Popis 1 SCALA2 3-45 A Datum: 2.7.217 Výrobní č.: 98562862 Grundfos SCALA2 is a fully integrated, self-priming, compact waterworks for pressure boosting in domestic applications. SCALA2 incorporates
ČSN EN ISO OPRAVA
 ICS 13.030.99; 83.080.01 ČSN EN ISO 14855-1 OPRAVA 1 64 0512 Červen 2010 ČESKÁ TECHNICKÁ NORMA Stanovení úplné aerobní biodegrability za řízených podmínek kompostování Metoda stanovení uvolněného oxidu
notice de montage Building Instructions montagehandleiding Instrucciones de construcción Istruzioni per il montaggio
 70339 17.07.2017 Aufbauanleitung notice de montage Building Instructions montagehandleiding Instrucciones de construcción Istruzioni per il montaggio Montážní návod Service-Hotline: +49 421 38693 33 Vergleichen
VY_32_INOVACE_06_Předpřítomný čas_03. Škola: Základní škola Slušovice, okres Zlín, příspěvková organizace
 VY_32_INOVACE_06_Předpřítomný čas_03 Autor: Růžena Krupičková Škola: Základní škola Slušovice, okres Zlín, příspěvková organizace Název projektu: Zkvalitnění ICT ve slušovské škole Číslo projektu: CZ.1.07/1.4.00/21.2400
Izolační manipulační tyče typ IMT IMT Type Insulated Handling Rod
 KATALOG CATALOGUE 024/09/2011 IZOLAČNÍ MANIPULAČNÍ TYČ INSULATED HANDLING ROD TYP IMT KOVOVÁ MANIPULAČNÍ TYČ METALLIC HANDLING ROD TYP KMT ISO 9001:2009 ISO 14001:2005 Izolační manipulační tyče typ IMT
Souminulý čas Imparfait Test
 VY_32_INOVACE_FJ_149 Souminulý čas Imparfait Test Mgr. Martina Šenkýřová Období vytvoření: únor 2013 Ročník: třetí a čtvrtý (opakování) SŠ Tematická oblast: Gramatika-morfologie: slovesné časy a způsoby
Ventil zpětný Z15.1 DN 10 50, PN 100 400 Piston check valve Z15.1 DN 10 50, PN 100 400
 DN 10 50, PN 100 400 DN 10 50, PN 100 400 Použití Zpětný ventil je samočinná armatura, zamezující zpětnému proudění provozní tekutiny, určená pro vodu, vodní páru, plyny i jiné provozní tekutiny používané
MA251 (cz_en) Operating instructions. MA251 (cz_en) Montážní návod. Krimpovací kleště PV-CZM... pro MC3, MC4 a MC4-EVO 2
 Operating instructions. MA251 (cz_en) Montážní návod. Krimpovací kleště PV-CZM... pro MC3, MC4 a MC4-EVO 2") MA251 (cz_en) Montážní návod Krimpovací kleště PV-CZM... pro MC3, MC4 a MC4-EVO 2 MA251 (cz_en) Operating instructions Crimping pliers PV-CZM... for MC3, MC4 and MC4-EVO 2 Obsah Bezpečnostní pokyny...2
MA251 (cz_en) Montážní návod Krimpovací kleště PV-CZM... pro MC3, MC4 a MC4-EVO 2 MA251 (cz_en) Operating instructions Crimping pliers PV-CZM... for MC3, MC4 and MC4-EVO 2 Obsah Bezpečnostní pokyny...2
ZI-DOP600. Návod k použití Čerpadlo na naftu a oleje. Operation Manual Diesel Oil Pump EAN: 9120039230085. Fax: +43 7248 61116-720
 ZIPPER Maschinen GmbH Gewerbepark 8 A-4707 Schlüsslberg Tel.: +43 7248 61116-700 Fax: +43 7248 61116-720 E-Mail: info@zippermaschinen.at Web: www.zipper-maschinen.at CZ Návod k použití Čerpadlo na naftu
PC/104, PC/104-Plus. 196 ept GmbH I Tel. +49 (0) / I Fax +49 (0) / I I
 / I Fax +49 (0) / I I") E L E C T R O N I C C O N N E C T O R S 196 ept GmbH I Tel. +49 (0) 88 61 / 25 01 0 I Fax +49 (0) 88 61 / 55 07 I E-Mail sales@ept.de I www.ept.de Contents Introduction 198 Overview 199 The Standard 200
E L E C T R O N I C C O N N E C T O R S 196 ept GmbH I Tel. +49 (0) 88 61 / 25 01 0 I Fax +49 (0) 88 61 / 55 07 I E-Mail sales@ept.de I www.ept.de Contents Introduction 198 Overview 199 The Standard 200
Pikolo PKP s.r.o. Svatopluka Čecha 1001 356 01 Sokolov. Název předpisů. Číslo předpisu TIP/001/2/2005
 IČ: 26342642 DIČ: CZ 26342642 Pikolo PKP s.r.o. Svatopluka Čecha 1001 356 01 Počet listů: Počet příloh: Výtisk číslo: Počet výtisků: 3 7 1 1 Název předpisů Technický předpis na kompletaci držáků na zrcadla
TechoLED H A N D B O O K
 TechoLED HANDBOOK Světelné panely TechoLED Úvod TechoLED LED světelné zdroje jsou moderním a perspektivním zdrojem světla se širokými možnostmi použití. Umožňují plnohodnotnou náhradu žárovek, zářivkových
ES prohlášení o shodě
 Výrobce Manufacturer Protherm Production s.r.o. Jurkovicova 45 909 01 Skalica Slovenska republika Označení výrobku Product description Závěsný plynový kotel, se systémem přívodu vzduchu / odvodu spalin
Pokyny k použití. Model-300. Napájecí zdroj. Návod na obsluhu Operating Instructions. se systémem Aquacontrol Napájací zdroj
 Pokyny k použití Model-300 Návod na obsluhu Operating Instructions Napájecí zdroj se systémem Napájací zdroj so systémom Power Supply with System BK 0011900 / PC AQUACONTROL Kryt aquacontrol Kryt aquacontrol
Název: Suites récurrentes étude à l'aide d'une suite auxiliaire
 Název: Suites récurrentes étude à l'aide d'une suite auxiliaire Autor: Mgr. Jiří Bureš, Ph.D. Název školy: Gymnázium Jana Nerudy, škola hl. města Prahy Předmět, mezipředmětové vztahy: matematika a její
Herzlichen Glückwunsch! Sie haben sich für ein Qualitätsprodukt der Firma Zangenberg entschieden.
 Herzlichen Glückwunsch! Sie haben sich für ein Qualitätsprodukt der Firma Zangenberg entschieden. Bitte lesen Sie die Anleitung vor der ersten Benutzung aufmerksam durch. Sie erhalten wichtige Hinweise
Web Element. Furniture for beautiful environments
 Web Element Furniture for beautiful environments Element Element range chairs boast subtle design and strikingly alluring look of backrest upholstery. Element chairs have been designed as a great working
Výukový materiál zpracován v rámci projektu EU peníze školám
 Výukový materiál zpracován v rámci projektu EU peníze školám Registrační číslo projektu: CZ.1.07/1.5.00/34.0229 Šablona: III/2 č. materiálu: VY_32_INOVACE_126 Jméno autora: Třída/ročník: Mgr. Anna Fekiačová